
Supplementary to the Tale of More Gamers Series, we look to provide ad hoc additional articles focusing further on collecting and modelling, battle reports and any events attended or run by the Admirals Table
Extended Ed Note: #InB4Author *ahem* Apologies, when reviewing and enjoying the initial draft article it quickly became apparent to me, as I compared what passes as a release schedule amongst the rabble that occupy the Admirals Table and the details herein, that certain persons and details were in place which could undermine or otherwise weaken the impact of an as-yet-unveiled Admiral. As such, I’ve taken on the solomn and entirely serious and 100% likely-to-succeed at maintaining secrecy approach of replacing all mentions of Rick’s opposing Admiral with that of a male-gendered Melon. For… reasons.
Avast! Ahoy! Etc!
You may feel a creeping chill alongside this article as I relay my first attempt at a game and the battle report itself!
Said cold comes from both the icy waters in which my fleet found themselves and the breath of the grave: the current fleet theme that I’m thinking of going for – to be expounded in a future article.
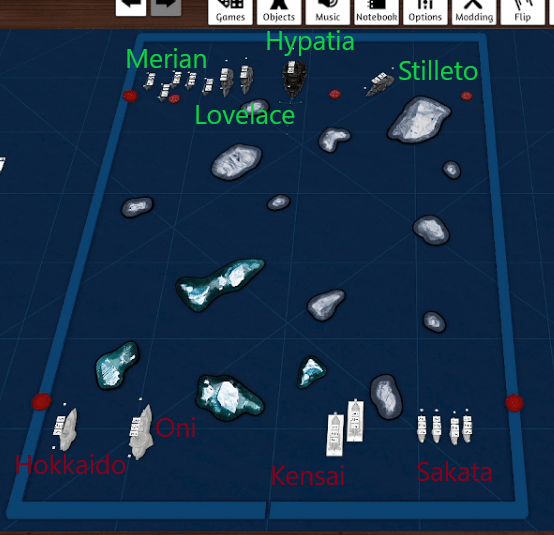
Admiral *Melon* of the Enlightened (at some point I’ll stop accidentally referring to them as the Enlightenment) was kind enough to put ships to water and do battle, despite having not actually read the rules at the point he agreed to the game! So, with a little help from the Enlightened forum on the Warcradle Discord, and guided by the Enlightened contents of the ‘Hunt for the Prometheus’ boxset that I confirm *Melon* was getting, I drew up the following 700pt list for him.
| Battlefleet Slot | Ship | Weapons/Systems |
| Flagship | Hypatia Generator Ship | 1x Pulse Emitter 2x Sturginium Agitators Shroud Generator |
| Line | 2x Lovelace Cruiser | 4x Sturginium Agitators 2x Scythe Launchers |
| Patrol | Stiletto Fast Cruiser | 1x Particle Beamer |
| Patrol | 5x Merian Automata Frigate | 5x Sturginium Agitators |
So, using my list idea from my previous Article, the two lists would be:
| Empire | Enlightened |
| Oni Command Cruiser 1x Heavy Torpedo Salvo 2x Baoyu Repeating Guns Heavy Shield Generator | Hypatia Generator Ship 1x Pulse Emitter 2x Sturginium Agitators Shroud Generator* |
| Hokkaido Heavy Cruiser 1x Focused Torpedo Salvo 2x Focused Heavy Alchemical Rockets 1x Focused Light Corrosive Mortar | 2x Lovelace Cruiser 2x Weirding Torpedo Salvo 4x Sturginium Agitators 2x Scythe Launchers |
| 4x Sakkata Heavy Destroyers 4x Light Torpedo Salvo 2x Light Gun Batteries 3x Light Alchemical Rockets 3x Light Corrosive Mortars | Stiletto Fast Cruiser 1x Weirding Torpedo Salvo 1x Particle Beamer 1x Advanced Aetheric Lance |
| 2x Kansai Submarines 2x Heavy Torpedo Salvo | 5x Merian Automata Frigate 5x Micro Torpedo Salvo 5x Sturginium Agitators |
* I’d completely missed that the Hypatia was “must” regarding it’s generators and thought that it was “may”. (Ed Note: this was a very important learning point and for various reason, reached the ears of all of the Admiralty at the Table almost immediately) Also, it turns out I’d been forgetting that having a generator means giving up a Heavy hardpoint (fortunately not a factor in these lists as the Oni – like the Hypatia – has a dedicated slot for a Generator)
In my head we had two roughly equivilant forces. Both of these forces had something the other did not (Submerged and Short Ranged Squadrons, or SRS as they are called) but which might be countered by something in the enemy fleet (Torpedoes – that due to their submerged rule can target submerged enemies such as submarines – and Flak Barrage – a system that allows a ship to make a Special Action to target SRS within 10″ and potentially remove them). I’m not sure if they are in fact perfectly balanced, but I don’t think they’re far off and contained enough interesting stuff – without overloading us – to scratch the complex rules and fancy ships itch. (Ed Note: with the benefit of hindsight, not so much. SRS play a much smaller, almost incidental, part of small scale games whereas Submerged is an incredibly powerful property – but we’ll leave that to the scholars. The fact that Rick and *Melon* played using both of these mechanics in their first foray into the system was fantastic and helped many of us start to contextualise the actual gameplay)
As I mentioned in my introduction article, I’m likely to be playing on Tabletop Simulator for the near future, so before we get into the report itself I thought I’d cover in a little more depth TTS and how it can be both a fantastic gaming aid and a great way to build and maintain hype in game systems you might not be able to play locally or often.
TTS is a quite literally a virtual tabletop. Initially designed for board games, with a variety of programmed board games as add-ons you can purchase to play through it, it is comparatively cheap (£16.75 at time of writing) and can run on most computers (very complex mods or games might strain a lower end graphics card or processer but with a bit of adjustment you should be able to make it work). TTS has a built in physics engine so you can realistically roll dice, things can fall over (and often do) and with a highly moveable camera angle you can move around the table and get true line of sight pretty easily. It’s not as complex to learn or use as it seems, but it looks daunting when you first start out. It is one of those things however that if you wanted to you could do some very impressive things with; one day I’m going to spend the time to make and run the Inquisitor campaign I wrote several years ago and haven’t been able to play.
So, if TTS is so good, I hear you ask, why play with miniatures at all?
Ignoring the obvious rebuttals of, “because painting, modelling, converting etc are all impossible” and “if no one buys the games miniatures companies make, then those companies won’t make games anymore, and their hard work does actually deserve the recognition of sales”, the main reason is because TTS is great, and it can be automated to do a lot of things that are harder to do in a virtual medium than on an actual table, and you’ll play great games with it, but I don’t think I’ve ever played a single miniatures game with it where I (or my opponent) haven’t uttered something along the lines of “gods-damn it TTS”. Some models are full 3d solids, some look solid but are actually entirely intangible, some terrain pieces have invisible meshes bigger than their visible meshes, out of the box you can’t make things turn less than 15°, sometimes things will collide or you’ll select multiple things at once and they’ll all come together in a bundle, super precise movement is simultaneously super easy and infuriatingly difficult, and for the love of whatever it is you hold most dear, never, ever accidentally Ctrl+Z (and you will do it instinctively, and some of the times it’ll be fine, other times it’ll unwind 15 minutes of play and then crash the game). TTS is a fantastic tool to have, and my ability to wargame would be massively reduced without it, but play it regularly enough and you’ll look forward to the next time you can put things on an actual table even more!
If there is ever any interest in more specifics, I’d be happy to do a much more in depth guide as to actually using TTS, and the Dystopian Wars module I use, so please just leave a comment or reach out and ask on the Warhounds2Warmasters discord!
That all now having been said, back to the battle!
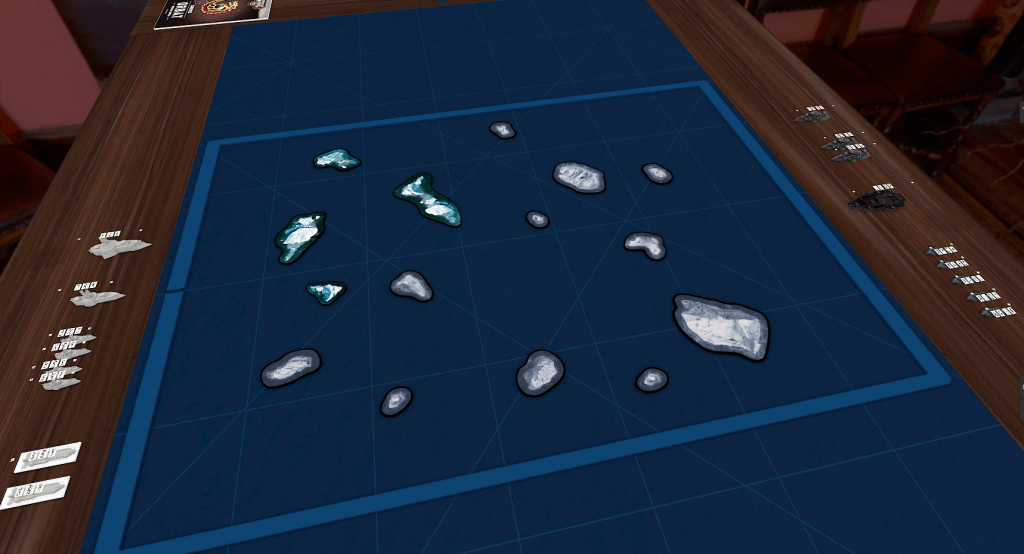
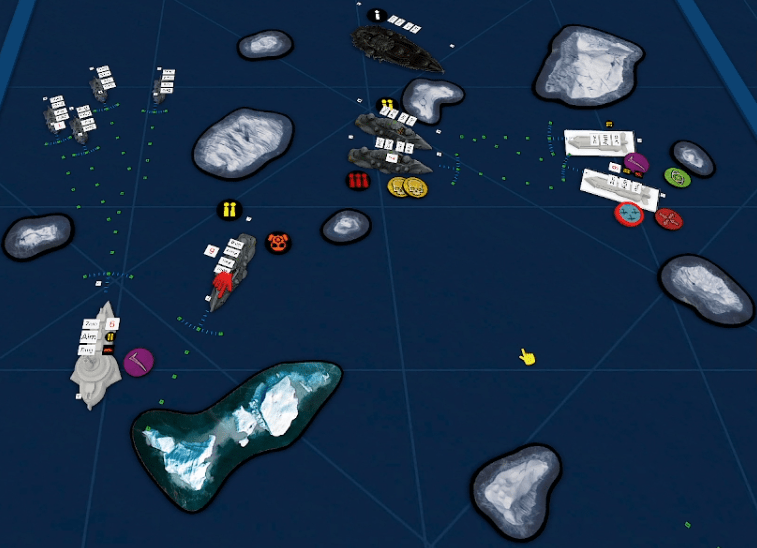
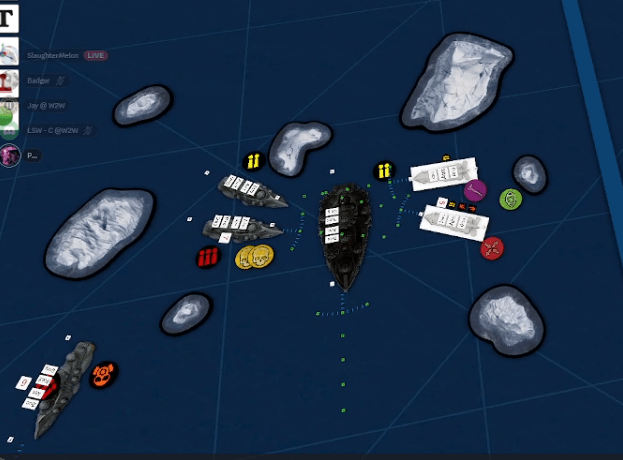
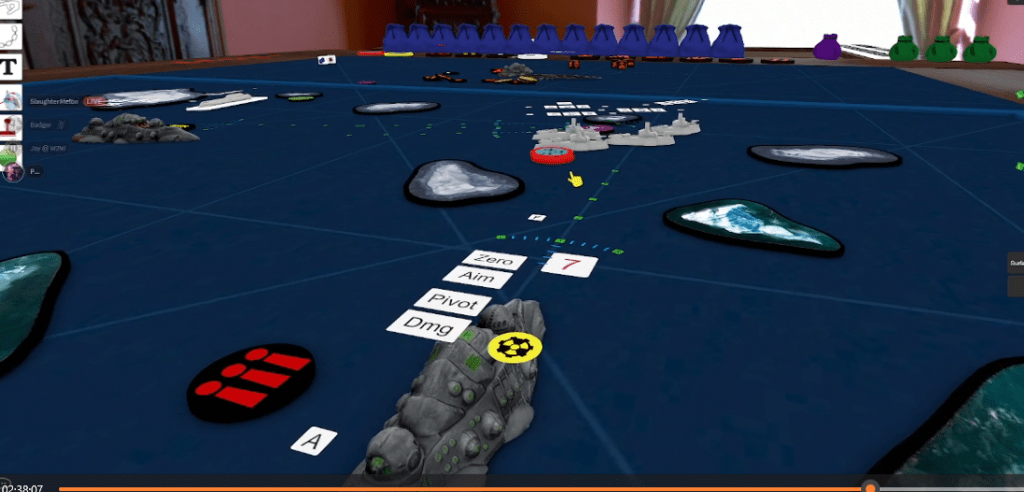
I set up a table, and our fleets using the guidance for a Small Engagement – that being 36″ wide and 48″ between player board edges – and the ~12 Mass of terrain in each quadrant. To explain, each terrain piece has a Mass similar to a ship and this comes into play for line of sight and obscuring – a target that can’t have a line draw from the firer’s centre point to any point on the target will either be out of line of sight if the intervening Mass is larger or the same as size as the target’s, or Obscured (and thus gain more Defence dice) if the Mass is smaller than the target – and the guide in the rulebook recommends potentially 12 total Mass of terrain per quarter.
I think I leant too far towards lots of small icebergs, as even by reducing the total Mass per quadrant to about 8-10 it still looked very busy, at the same time planet bowling-ball (even on the open ocean) is always going to be less interesting to play on!
A quick note on this and all the pictures of the game, Admiral *Melon* was live streaming the battle to the Admirals on Discord (I think we had 6 of them at one point, and some of them even stayed to the end!) and I was recording it for posterity and future viewing so all the pictures are screen grabs from my recording so quality may vary. But it was that or post over 3 hours of unedited TTS content… and no one wants to watch that!
Scenario-wise we just went with VP for crippling things for ease of learning the rules, so game plan for both of us was primarily just ‘kill stuff’. For those like us just learning the game, each model has a VP rating in its ORBAT, this is the amount of VP the opponent receives for reducing that ship to 0 Hull (a.k.a Crippling it). In the Core Rules models are immediately destroyed when their hull is reduced to 0, but in the Advanced Rules (or Core+ as we were playing) ships remain once Crippled and are only removed when they receive enough Critical Damage affects (either from having them already or from each additional point of damage) equal to their Mass, at which point they Catastrophically Explode dealing damage and Disorder to all other ships within inches equal to the exploding ship’s Mass.
I tried to deploy as best to take advantage of terrain whilst also wanting to keep my longer range weapons available and not going to be immediately neutered. I also decided to skip Deceptive Deployment for simplicity but I did use Forward Deployment on the Kansai and Admiral *Melon* used Vanguard to move the Stiletto forward.
Deceptive Deployment is a Property all Japanese faction Empire ships have that allows them to redeploy as a Special Deployment Action after having already been deployed. This can also be used to put something into reserve that wasn’t originally.
Forward Deployment means a model can’t be held in Reserve but can be deployed anywhere on the board so long as it’s at least 10″ beyond the enemy Deployment Zone and not within Proximity (2″) of an enemy.
Vanguard is also a Property allows a Special Deployment Action, this time allowing a unit to make a move up to the value of their Vanguard property.
Turn 1
In games of Dystopian Wars Admirals can try and claim initiative (or the right to activate a unit first) by comparing the value of Victory and Valour cards with the person with the highest card getting to choose. As we weren’t using the full Victory & Valour rules we both drew a single card from our deck and though Admiral *Melon* had won the initiative he chose to Hold his Nerve (giving initiative back to me, normally getting to draw an extra V&V card in the process) and so gave me first activation. Entirely due to cunning tactical decisions, and not because he wanted to see how activation (and TTS) worked.
We accidentally skipped the Launch phase, but came back to it when we realised, and it didn’t make a huge difference to the round.
A round should go: Ready Phase, Launch Phase, Activation Phase, End Phase.
In an attempt to act before the target moved out of the way my Kansai advanced slightly and then fired their torpedoes at the Stiletto. With two Subs they could combine the 7 dice of torpedoes into a single 14 dice attack but with my 7 strikes to the target’s 4 counters, vs armour 3 meant nothing but ominous thuds against the hull! (Ed Note: Umm… I’m not sure that that Maths maths. 7 strikes minus 4 counters equals 3 hits into Armour 3 should be 1 Hull Point, no?)((Author Note: That’s because my recollection is wrong! The Stiletto has 4 Armour so my 3 leftover strikes failed!))
For those of you also new at this, in Dystopian Wars attacks are made (in most cases) as an opposed roll, where the attacker is looking to roll and add together red results (Strikes which = 1, Heavy Strikes which = 2 and Exploding Strikes which = 2 and allow an extra die to be rolled, potentially exploding indefinitely) while the defender wants to roll blue results (Counters = 1 & Heavy Counters = 2). The number of dice each player rolls is dependant on the weapon’s Firepower at the specific range bracket (Close – 0-10″, Standard – 10-30″ & Extreme >30″) for the Attacker, and the Defence value of the target for the Defender (modified by obscuring if relevant). Once all the dice are rolled the attackers total number of Strikes is split into groups equal to the target’s Armour with each complete group of strikes dealing 1 Damage.
Admiral *Melon* activated the Stiletto and went in for a long shot at my Sakkata but as with my activation, again the impacts failed to breach the armour.
Continuing this sequence of units activating once fired upon, my Sakkata took their turn to move and come about; lining up on the Stiletto. Whilst no damage was gained from the torpedoes, they scored first blood with the combined fire from their Rockets, Mortars, and assorted Guns, leaving the Stiletto with a single Hull Point remaining, a Hazard Critical Effect and two Disorder!
In Dystopian Wars weapons can combine their firepower even if they’re not identical (barring some keywords which explicitly prevent it – the submerged trait on Torpedoes being one example) and Alchemical Rockets have the ability to cause the Hazard critical effect, while the Corrosive Mortars have the Mayhem trait that always causes Disorder if damage is caused.
Next up were the Lovelace, and it was at this point that we realised the SRS should already have been in the sky! So, belatedly, the Scythe squadrons came out and guided the torpedoes in, to the tune of 4 damage to one Kansai, causing the unit to blow it’s tanks and surface.
Submarines have to make a crew check if they suffer disorder or automatically surface, a lovely rule that represents the limitations of the Dystopian Era technologies. As to the SRS, Enlightened Torpedoes have the Guided rule, that increases their attack dice when the enemy have an SRS token on them.
The Hokkaido steamed gently forward firing at the Lovelace, torpedoes continued to do nothing, but the barrage of mortars and rockets did 3 hull damage, a disorder and set the closest target Ablaze!
Ablaze is part of the Alchemical rule – which I’ve heard might be changing due to potential unnecessary complexity – but basically a model gains Alchemical tokens and becomes Ablaze when it has any of these tokens. Once a ship that is Ablaze has as many tokens as it’s Mass it takes a Hazard critical effect.
Dan’s flagship Hypatia turned towards the Kansai and fired everything at them (it was also at this point that we realised the Hypatia’s benefits should have been protecting most of the rest of Admiral Melon’s fleet), inflicting another hull on the damaged Kansai.
My flagship moved as far forward as it could and fired at the Merian, obliterating one with its torpedoes and then put speculative baoyu shots into the Lovelace to no success.
Being Light Ships, Merian are immediately removed when they take their Hull in damage and don’t explode when they are.
Scythe fighters swarmed the damaged Kansai dealing a System Failure and then the Merian moved up to agitate my Oni. 22 strikes off the 4 remaining Merians dealt 2 damage and a Structural failure to the Empire flagship and rounded out turn 1.
Agitation is keyword on some Enlightened guns that means they get more dice the greater the Mass of a target up to a specified limit. So by firing at my largest ship the Merians were able to ‘punch up’ very effectively!
Turn 2
This time Admiral Melon struck first, continuing his offensive against my submarines, sending both the SRS and the Lovelace toward the still surfaced Kansai. Wavelurker let the Lovelace slip through the Stiletto without collision and fire!
Wavelurker is – I believe – an Enlighted specific trait that allows ships with it to move through one another as if they weren’t there, and gets them additional defence against non submerged or assault weapons!
(Another rules mistake cut in. We totally mixed up how treacherous waters vs proximity to things worked when it came to generating and clearing disorder, so played the whole game thinking that moving within 2” of terrain caused disorder and ending within 2” meant no rallying!)
Torpedoes left the injured sub on 1 hull and the agitators just tipped the Kansai into crippled! First VP to Admiral Melon!
Unsurprisingly the Kansai came straight back with their torpedoes into the Lovelace dealing 4 damage and taking the damaged one up to 3 disorder! But failing their crew action to perform maintenance, and thus continued bobbing on the surface, staring down the Enlightened fleet.
The Merians continued their offensive against the Oni dealing another 4 hull and a disorder!
Foolishly I then chose to activate the Oni rather than waiting for the Stiletto to move – which is the first thing I can point at in the game where I made definitively the ‘wrong’ tactical decision. Unfortunately, not only was it the wrong decision to activate, the Oni proceeded to only do a single point of damage to a Merian.
And this is why it was the wrong choice to activate the Oni!
The Stiletto charged forward fired its guns and crippled my flagship! Attempting to maintenance away its Hazard it did fail but this put Admiral Melon quite solidly on the scoreboard with 7 VP to my 1 so far!
The maintenance action is primarily used to remove critical effects from ships, which can be pivotal to their continued function, and can be the difference between them exploding or not!
In an attempt to redress the scoring imbalance the Hokkaido kept bullying the Merians, destroying one with rockets and failing to do anything with the mortar. 7 to 2! Totally making a difference!
The Scythes dropped in to breach the crippled Kansai, and then the Hypatia activated!
As the Kansai was crippled additional damage was causing critical effects and Admiral Melon rolled a Breach Critical, which would mean the next time the Kansai activated that one would take an additional damage (and therefore critical effect) unless I could repair it.
“Activate the Turbo-encabulation drive!”
“Bending time and space!”
Teleporting past the iceberg that it would otherwise have collided with, the Hypatia repositioned to be unpleasantly close to my Kansai!
The Enlightened have a brilliant ability called Turbo-Encabulation Drive, which as implied by the above, lets them teleport their ships across the board, but generates an ever increasing dice pool that can lead to a teleportation mishap potentially damaging or destroying ships that attempt it!
The Sturginium Agitators fired into the crippled sub, 17 strikes, 0 counters, 3 armour led to 5 criticals and our first catastrophic explosion! 1 damage splashed onto my other Kansai and one back onto the Hypatia, which fired its pulse emitter into the other Kansai dealing another damage due to both of us being on 3 disorder. Then the broadside fired!
The thunder of big guns was heard echoing off the ice and as the smoke cleared the broadside had dealt another 3 damage!
Broadsides work slightly differently to other weapons as all ships have a unique Broadside value that tells you how many dice to roll, but can only be used within 4″. Despite a smaller dice pool and shorter range, there is no resistance roll, and Strikes deal direct hull damage bypassing a ship’s armour rating. And you can fire your broadsides at multiple ships in range as a single action!
Last for me were my Sakkata, and realising they were Hunter (Capital) they took aim on the Enlightened flagship! Torpedoes contributed a single damage, but the main volley of rockets, guns and mortars were significantly more successful! 12 exploding strikes led to a total of 41 strikes against 7 counters, crippling the Hypatia and giving it a navigational lock, 2 structural failures and 3 alchemical tokens!
The Hunter trait allows ships with it to reroll blanks in their attack rolls when firing at their preferred target!
Suddenly the score was 10:7 to the Empire!
The Merians couldn’t stand for this and so fired into the Oni, scoring enough criticals to destroy it! No additional VP gained, but no flagship for the Empire!
You get no additional VP for removing ships, only crippling them, so there’s a solid debate between removing an enemy piece from the board vs trying to score more points by firing into non-crippled (aka Battle-Ready) targets.
Turn 3
This time the Empire took the initiative, clearly the commander of the Oni had been slowing them down!
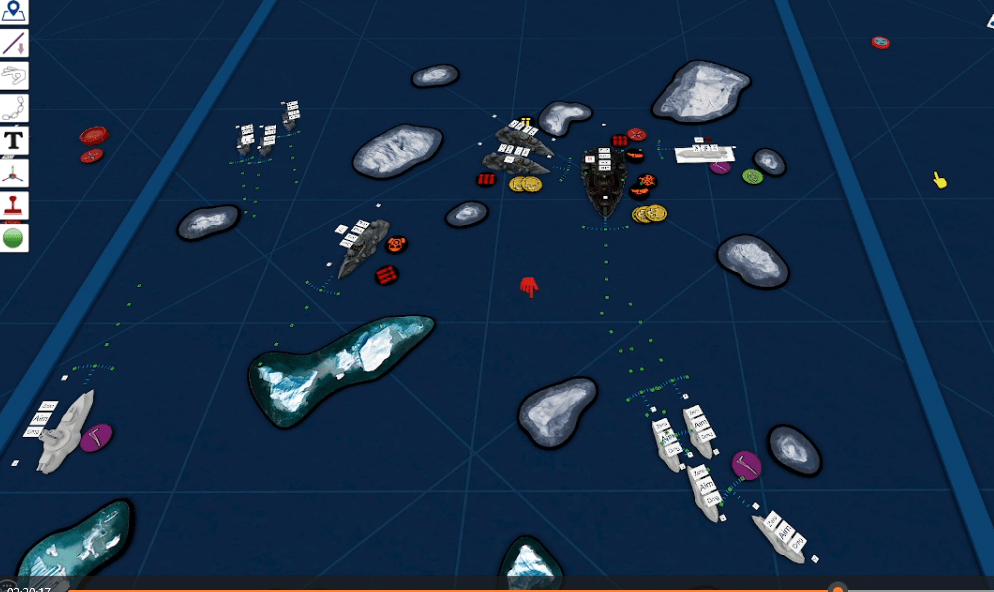
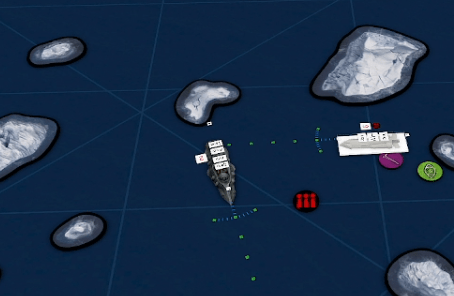
Unsurprisingly the Sakkata went first! Churning their engines into full stop 3 of the 4 held position, while the fourth moved forward the absolute minimum. This time they started with their ‘colossal barrage’, it was only 29 strikes this time, but the 4 resultant criticals that went through caused the Hypatia to explode, and splash damage from the explosion crippled both one Lovelace and the Kansai! The follow up torpedoes put a breach, a hazard and a breach onto the crippled Lovelace which then also exploded, doing another damage to its twin!
The Full Reverse rule allows ships to set their minimum forward speed to 0″, potentially move and turn backwards for the cost of Disorder. Something which can be exceptionally useful for longer range weapons.
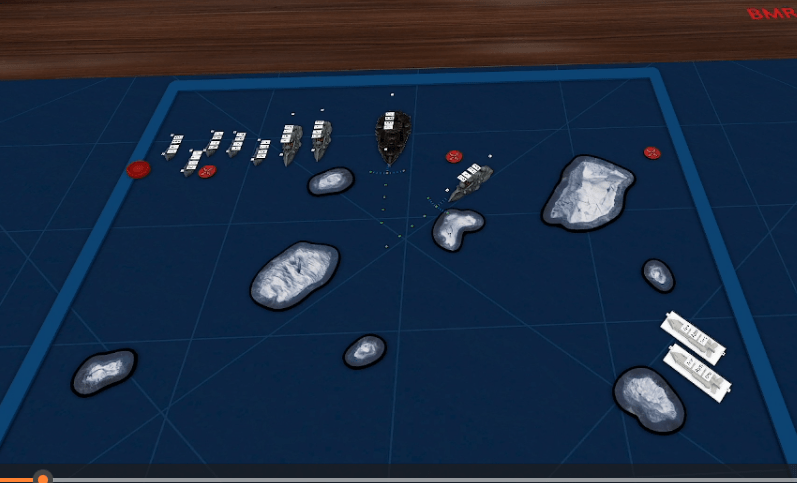
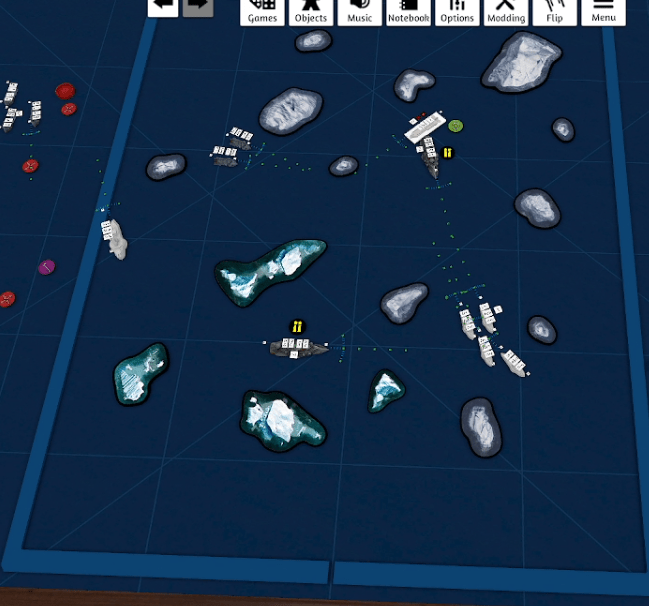
From this:

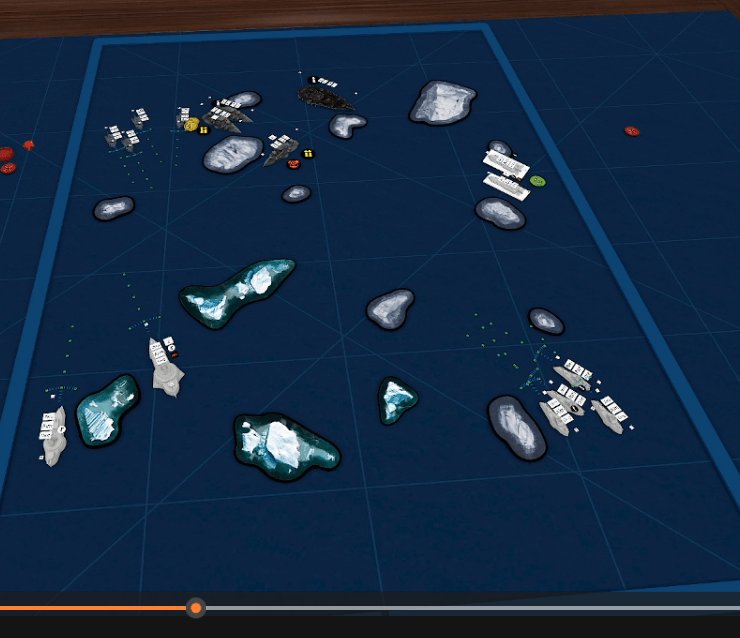
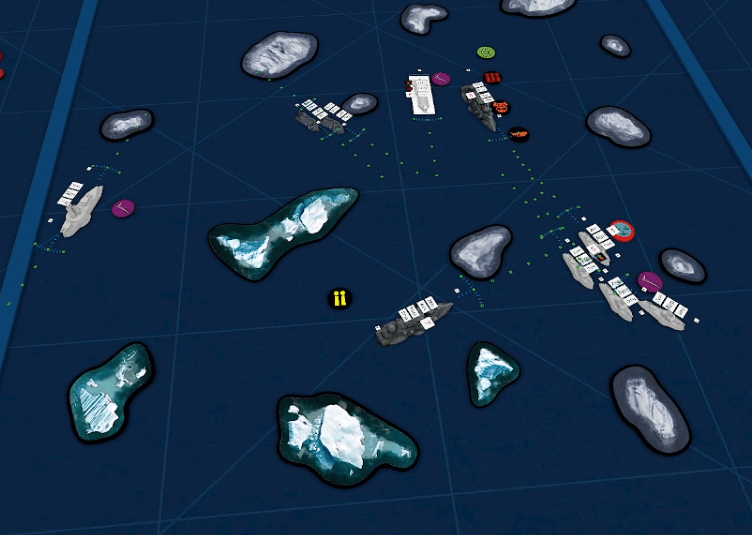
To this:
The remaining Lovelace fired back, doing 1 damage to a Sakkata and 1 damage to the Kansai.
(It was at this point I was concerned that I may not have made these lists as balanced as I’d thought, and/or that my dice might have been doing… rather well!).
My Hokkaido did a manoeuvre towards the board edge and opened up on the Merians again, this time splitting the mortars out to fire indirectly at an injured Merian doing nothing, while the rockets and torpedoes killed another one.
The Stiletto deciding to outflank the heavy destroyers activated the turbo-encabulation drive and teleported successfully! Jade Fury failed to prevent the shots and torpedoes hit the water and flew towards the Sakkata, guided in by the Scythes still overhead!
The Empire’s equivilant to Turbo-Encabulation, is Jade Fury, a Battlefleet ability that forces enemy ships with the Hazard critical effect to have to make a crew check to take any action other than a maintenance action, potentially very powerful!
But bounced off the armour!
(One thing we completely forgot was that disorder makes a ship’s crew rating worse!)
Disorder impacts a ship’s ability to fire effectively, potentially causes damage if ship manuveres hard and gives a penalty to effective crew rating! All things that will collectively get worse over the course of the battle if one can’t manage it!
Not wishing to still be on fire the Stiletto, performed jury-rigged repairs and removed the hazard!
My remaining activation was the Kansai, which made a danger close manoeuvre around the rear of the Lovelace and put long range torpedoes to no effect into the Stiletto.
The Scythes dived upon the Sakkata but failed to breach their armour.
Finally the Merians turned to port and fired on the last Kansai, crippling it and inflicting a systems failure.
Systems Failure is a critical effect that turns off anything listed in a ship’s ‘System’s box – including generators added to the ship. Some weapons such as Voltatic get bonuses when firing at ships with Systems Failures – but neither of us had any of those!
Turn 4
We decided that this would be our last turn as it was already past 23:00 by this point (another downside of TTS is games take longer, even once you know how to play them!).
Again, without their commander to hold them back the Empire took the initiative and attacked!
With a number of potential targets the Sakkata aimed to take out the most valuable target and full stopped to keep their rockets in effective range. Torpedoes followed by the main volley left the Lovelace with 6 damage, 3 disorder, a breach and a hazard, and rather unhappy!
In an attempt to do something before it exploded, Admiral Melon activated the Lovelace next, which sadly failed to scratch the paintwork on the Sakkata but a maintenance action removed the breach before it could do more damage.
The similarly unhappy Kansai turned to stay close to the Lovelace so if it died it might take the other ship with it and fired speculative torpedoes into the Stiletto and though successful in launching them, failed to do any damage.
The Merian lined up their own torpedoes on the Sakkata and again bounced off. (I think at this point I became convinced Sakkata might be the best thing in the Empire ORBAT – Warcradle please don’t nerf them! At least until I’ve actually got to use the models in person!)
I made a mistake in how full reversing worked, thinking I could back up and turn forwards, the Hokkaido absolutely made an illegal move, but fortunately had it turned backwards instead of forwards wouldn’t have made a difference (other than possibly actually being in a better position). It fired into the Merian, torpedoes to no effect but rockets and mortars did another 2 damage crippling the Lovelace to the tune of 3 more VP!
In retrospect, I’ve realised that as well as this was an illegal move, we’ve actually played it wrong in a completed different way since! The Full Reverse rule states that “for the duration of the Movement step the model moves backwards instead of forwards” as well as setting its minimum forward speed to 0″ and increasing it’s turns rating by 2 (to a max of 4). So in my game with the Editor a bit later we accidentally turned backwards and then moved forwards, which is also illegal!
The final activation of the game was the Stiletto torpedoing and particle lancing my Sakkata and despite my ability to roll many explosions throughout this game they were less useful in the defensive rolls! The combined weight of fire crippled one Sakkata as well as giving it a breach, gaining Admiral Melon 1 more VP and setting the final score to 17:10 to the Empire!
Overall, a fantastic game, and not too many rules errors!
From my perspective the Sakkata definitely paid for themselves several times over, consistently putting out damage and negative effects all the while surviving weapon fire from multiple angles and enemy vessels.
I got the Oni killed so is harder to rate, but the Baoyu didn’t feel particularly impactful – probably not helped by the fact I always read Indiscriminate and High Velocity at the same time so I can’t remember which rule does what – but as I like the Oni I’m definitely going to have to run more tests! But the heavy shield generator giving it armour 6 seemed amazing!
The Hokkaido was generically decent at contributing long range fire, and though it didn’t get to show off I think it’s safe to say I’ll be planning to have at least one in the long term!
Kansai were an immediate problem for Admiral Melon and though their damage wasn’t incredible, they stuck around being a threat and getting around the benefits of Wavelurker, while being more survivable than I’d expected, even while surfaced!
I think the entire game can probably be summed up by Admiral Melon’s recurring statement of,
“Much to consider.”
And to be honest, that’s what you want when you’re learning a new game system!

Leave a comment